Showing posts with label kitchen. Show all posts

Monday, April 23, 2018

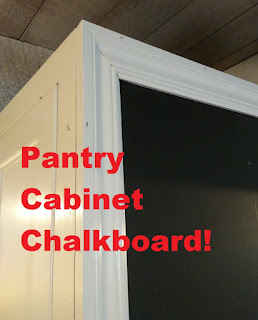
Pantry Cabinet Chalkboard!


Our kitchen cabinets were bought at a second hand store, and while they're excellent quality and just beautiful, the pantry sidewall was in need of a makeover. 
My sister had the brilliant idea of doing a chalkboard there. I've never worked with chalkboard paint, so was a little unsure about it. I lightly sanded the whole surface, since there were areas of paint, as well as stain on the pantry cabinet side. You want to make sure you've taken any "shine" off, so the paint will adhere. 


I used a synthetic roller, and Valspar Black Chalkboard Paint. Three coats in total, letting each coat sit for a whole 24 hours before adding another coat. 

Some inexpensive trim was then added to frame it out, and voila! Works like a charm and the kids LOVE it! 

A couple of notes: after the final coat was applied, I waited three full days. Then, we applied chalk ALL over the board, using the long side of the chalk piece to cover every inch of the chalkboard. I then wiped it off with a dry cloth. This primes the board to make it ready for use. After that, normal cleanup works just great. You can wipe it with a dry cloth, or occasionally use a slightly damp towel to get it really nice and clean. 


Wednesday, April 18, 2018

Kitchen Complete! (THE Last Kitchen Post, I Promise!)

It is so good to be back home and finally able to post on my computer. 
We've finished the kitchen---- actually, now that I think about it, it's not 100% just yet... still have a bit of trim to put up--- but it's close enough to write a "finished" post for it. It's so beautiful I just can't stop myself from sharing! 

Get ready for lots of pictures!

I painted the ugly, old, metal door to the laundry room a glossy "colonial red".
I really like the way it turned out. 

Love the light fixtures that were so kindly donated to us by a wonderful, local lighting company! 

After opening up this wall between the kitchen and what used to be our bedroom, we decided to make it the family room, and built this nifty little "double bar" area. We reused some of our wonderful shiplap/tongue and groove wood that we salvaged from the upstairs ceiling.  

Having colors in the kitchen is definitely something new for me. I've always been a strictly all-white paint, farmhouse style kinda girl. But I really, really love my new, old kitchen. 

Open shelving is also a new thing for me, and I just sorta threw this random stuff up there. I have more kitchen boxes that need to be unpacked and gone through. Everything was so hastily boxed up after the fire, that I'll need to take some time to sort it all out. 

If you look closely at the brown colored shelf/cup hanger, you'll see where it was starting to burn. It had been hanging on that wall where the fire was moving down into, from the room up above the kitchen. 

At the time the above pictures were taken, we hadn't refinished the original wood floor yet. Here are some pictures of that process:
Using an orbital floor sander with open 20 grit sand paper, we attempted to remove all the old nasty glue that had been applied, along with nails, when they had installed plywood and linoleum over this beautiful floor years and years ago. 

Some of the glue just wouldn't budge, even after getting down there ourselves and scraping and picking and peeling. But the majority of the floor looks great so we just decided to go with it. 


Two coats of polyurethane later, and I'm now even more in love with our kitchen than I was before! 


Saturday, March 31, 2018

Whitewashing the Kitchen Ceiling

We tried our hand at whitewashing the kitchen ceiling and I think it turned out pretty nice.


As you recall, the tongue and groove ceiling had been cut up in places during the firefight, so we had removed the ceiling layer, leaving behind the beautiful rough cut joists and the underside of the upper room's flooring.


We used a paint sprayer for most of it, but I wasn't too thrilled with the spattering pattern it kept spraying. I think a brush would have been better, and I did a lot of touching up with a brush.


I think it's quite lovely how it turned out. Still showcases the character of the room but with a more "finished" look.


Wednesday, March 7, 2018

Kitchen Coming Along

This post will cover some of the work that's been done in the kitchen. Its not finished yet, so that will be another post later on.


The dining area of the kitchen, immediately after the fire.
The kitchen after the fire was completely soaking wet.


Everything had to be removed. There was water inside all walls, around cabinets, etc. Of course all electrical wiring was melted as well.


There were 4 layers of wallpaper beneath the wood paneling.
The newly revealed wood floors look promising!
This wall was burnt out pretty badly and has to be repaired.


Part of the ceiling had to be cut up during the firefight.
So we decided to remove the ceiling shiplap to give the ceiling a bit more character, as well as give it the appearance of being a little higher than it is. We plan on whitewashing it.


That burned out wall has now become an open doorway that steps down into the family room from the kitchen. On the right, we've added a small bar top.
Insulation is up, new wiring throughout, and even some lights!
Most of the kitchen will retain its shiplap, but the areas behind the cabinets are all drywall.


Cabinets are going in!

Its definitely starting to look like a kitchen once again! I'm so excited to see it come together. I'll be baking homemade bread again soon!


Friday, February 23, 2018

We've Moved Back Home

Knowing that the homeowner would return and need his home back at any moment, we readied what we could of our house for our return. My office, and the little boy's bedroom is now our sleeping space, and the only fully enclosed, and therefore, able to be heated rooms.


We have a makeshift kitchen and eating area in the parlor. We brought the old drop leaf table in from the front porch, and cleared off some bookshelves for food storage. A workspace for coffee maker, microwave, and toaster was made from scrap wood secured over boxes and the now-unused fish tank stand.


The actual kitchen is coming along great. All wiring has been run, burnt-out wall repaired, and new insulation hung. The range and refrigerator are powered up and in use.  Now we just have to hang drywall, install cabinets and sink, paint walls and ceiling, and refinish the floor.


Oh, and in case you're curious, here's where I do dishes.


Thursday, January 11, 2018

Bare-naked Kitchen

We completed clearing out the kitchen and it looks pretty good- all things considered. 

The hardwood floors are in decent shape with only a couple of bad spots and a whole lot of nails to pull out from the plywood that had covered it.