Showing posts with label House fire. Show all posts

Monday, May 25, 2020

Is This My Once a Year Update?

Howdy!

I actually found myself googling, "Do people still read blogs?" before I sat down to write this. And whether they do still read blogs or not, I found myself compelled to add another post... even if only for my own "story keeping." 

Yes, we are still YouTubing as well, but here's a quick update as to all things TwelveAcres.

With the CRAZY stuff going on in the world today, I'm withdrawing deeper and deeper into our little farm. We are making growing our own food a bigger priority this year than ever before. The fragile food system that is crumbling before our very eyes, has jolted a lot of people out of their slumber. 
The fresh meat sections at our local supermarket. 


Because of that, we've upped our game. 


The garden is a little bigger this year, our incubators are constantly running, the rabbits are perpetually kindling... you get the idea. 
 Our "pig venture" is still proceeding. Darla, our York/Blue Butt cross is pregnant and should be due in July. Frank, the Hereford boar, is still as sweet as ever, and even teaching Darla how to love being scratched. They are growing ever bigger and we hope to be able to expand their pens yet again this year. And I'm learning all I can about hog pregnancies and birth!

Handy Husband has seen some employment difficulties this year, so another new venture of ours is making home décor and furnishings from reclaimed wood and pallets. We've opened up an Etsy shop for the smaller items; if you get a minute, we'd love to have you take a look at what we offer. 
One of our handcrafted "noodle boards," aka stovetop covers.  
Some new critters on the farm this year, are (FINALLY) turkeys! We've been talking about getting turkeys for years now, and we finally bit the bullet! We have 12, 4 day old poults: six Narragansett, and six Bourbon Red. We plan on raising a few of these for the freezer, and the rest will be kept as breeders to hopefully keep us in turkey for years to come. 


 I can't think of anything else new. We are still recovering from the housefire, believe it or not. The siding is about 90% done, and we have still have to paint. We also have two massive piles of debris to remove from the property, but without a truck it's not that easy. One day at a time! We'll get there eventually.

Thanks for stopping by the blog. I may update more frequently as the mood hits. Take care everyone and I'll see you back here next time! 

Sunday, August 25, 2019

Blog Update!

Good afternoon! I suppose it's time to update you all as to WHY I haven't posted on here much lately. We've decided to switch over to primarily doing YouTube. I try to post new videos at least once a week, but sometimes I upload as often as every couple of days! 

Here's the link, in case it is not visible elsewhere on the blog:


And here are a few links to some of our most recent videos:


I hope that you can all check it out, and thanks for stopping by here!


Saturday, May 26, 2018

Master Bedroom BEFORE, DURING & AFTER

As you may recall, in the course of repairing our home after the fire, we decided to swap out the family room and master bedroom, so that the master bedroom is now where the family room used to be. Here are the pictures of that transformation.

The room where it all started. If I could go back to that night, Christmas Eve, and NOT make that fire burn so hot, I would in a heartbeat. But really, it was probably inevitable... who knows how many near fires we had over the years, that we were blissfully unaware of. The rafter wood that was butting up against the stove pipe was so old and dried out, it was just a matter of time before it could no longer take the heat. 

See the smoke coming off that beam? This was the next day, following the initial fire, and we had to call the fire department back out to put out more smoldering that we found in the attic spaces. 

It's almost enough to make you want to just walk away. 

But once the worst part of the debris was removed, it looked much more hopeful.

Everything was taken down to the bare studs. 

The beginning of the roof removal process. 

It's nearly gone. 

This was a crazy sight that we'll never see again. 

Love the smell of all that new lumber!

I hung every single piece of insulation in this room, and the room that became our family room, as well as the bathroom and closet. It took a few days. 

The room really started taking shape once the drywall was hung.  

This process took a couple of weeks. The high humidity made the mud very slow drying. 

The little kids "helped" me put the primer coat on. They sure love to help! 

And here it is finished. I have some decorating to do yet, but all in all, it looks pretty good. The furniture isn't in their permanent places. Since some of the other rooms are still unfinished, I have random pieces of furniture in this room. 


The door on the left leads into the bathroom/vanity/closet area, and the door on the right goes into Handy Husbands new "man room". We partitioned the huge room to make two rooms. And they're still plenty big. 

Monday, April 23, 2018

Family Room Nearing Completion

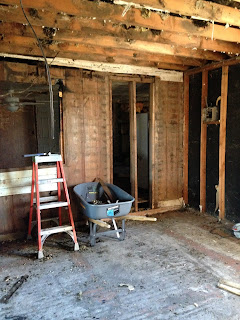
At the time of the fire, the kitchen shared a wall with what was our master bedroom. That particular wall, however, was burned out on the inside, from the fire in the room up above moving down into it, and would have had to been rebuilt. 


Upon opening the wall up to replace the burnt studs, we found a covered up window opening and door opening. So, there were a lot of patched together areas inside this wall. 


Here's the rest of the room, now naked, after removing the soggy drywall and soaked insulation. 

The view from inside the kitchen. With this wall being opened up to replace the burnt 2x4s, we realized how neat it would be to go ahead and leave it opened up and move our family room to this room, just off the kitchen. 

We added a new, strong header to replace the studs in the wall. 


A new step down into the family room was built out of the salvaged tongue and groove boards. 

The walls and ceiling are painted in greys and browns. All mis-tinted paint that we were fortunate to get. 

I have a lot more "family" pictures to hang, but this is a good start. 

Beautiful ceiling fan donated by a local lighting company. 

View from the kitchen. I love the flow of these two rooms now! Very family friendly!

Above: This is the "computer cubby" made out of salvaged tongue and groove boards. 


Two pictures above: We made a double sided bar, also out of our salvaged shiplap.
Another great place for kids to sit, eat, draw, etc. 


Wednesday, April 18, 2018

Kitchen Complete! (THE Last Kitchen Post, I Promise!)

It is so good to be back home and finally able to post on my computer. 
We've finished the kitchen---- actually, now that I think about it, it's not 100% just yet... still have a bit of trim to put up--- but it's close enough to write a "finished" post for it. It's so beautiful I just can't stop myself from sharing! 

Get ready for lots of pictures!

I painted the ugly, old, metal door to the laundry room a glossy "colonial red".
I really like the way it turned out. 

Love the light fixtures that were so kindly donated to us by a wonderful, local lighting company! 

After opening up this wall between the kitchen and what used to be our bedroom, we decided to make it the family room, and built this nifty little "double bar" area. We reused some of our wonderful shiplap/tongue and groove wood that we salvaged from the upstairs ceiling.  

Having colors in the kitchen is definitely something new for me. I've always been a strictly all-white paint, farmhouse style kinda girl. But I really, really love my new, old kitchen. 

Open shelving is also a new thing for me, and I just sorta threw this random stuff up there. I have more kitchen boxes that need to be unpacked and gone through. Everything was so hastily boxed up after the fire, that I'll need to take some time to sort it all out. 

If you look closely at the brown colored shelf/cup hanger, you'll see where it was starting to burn. It had been hanging on that wall where the fire was moving down into, from the room up above the kitchen. 

At the time the above pictures were taken, we hadn't refinished the original wood floor yet. Here are some pictures of that process:
Using an orbital floor sander with open 20 grit sand paper, we attempted to remove all the old nasty glue that had been applied, along with nails, when they had installed plywood and linoleum over this beautiful floor years and years ago. 

Some of the glue just wouldn't budge, even after getting down there ourselves and scraping and picking and peeling. But the majority of the floor looks great so we just decided to go with it. 


Two coats of polyurethane later, and I'm now even more in love with our kitchen than I was before!