Monday, April 23, 2018

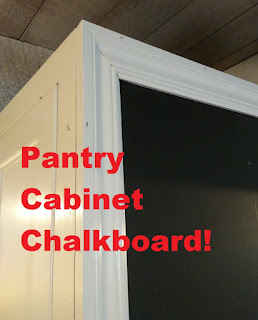
Pantry Cabinet Chalkboard!


Our kitchen cabinets were bought at a second hand store, and while they're excellent quality and just beautiful, the pantry sidewall was in need of a makeover. 
My sister had the brilliant idea of doing a chalkboard there. I've never worked with chalkboard paint, so was a little unsure about it. I lightly sanded the whole surface, since there were areas of paint, as well as stain on the pantry cabinet side. You want to make sure you've taken any "shine" off, so the paint will adhere. 


I used a synthetic roller, and Valspar Black Chalkboard Paint. Three coats in total, letting each coat sit for a whole 24 hours before adding another coat. 

Some inexpensive trim was then added to frame it out, and voila! Works like a charm and the kids LOVE it! 

A couple of notes: after the final coat was applied, I waited three full days. Then, we applied chalk ALL over the board, using the long side of the chalk piece to cover every inch of the chalkboard. I then wiped it off with a dry cloth. This primes the board to make it ready for use. After that, normal cleanup works just great. You can wipe it with a dry cloth, or occasionally use a slightly damp towel to get it really nice and clean. 


Family Room Nearing Completion

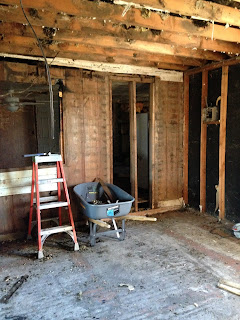
At the time of the fire, the kitchen shared a wall with what was our master bedroom. That particular wall, however, was burned out on the inside, from the fire in the room up above moving down into it, and would have had to been rebuilt. 


Upon opening the wall up to replace the burnt studs, we found a covered up window opening and door opening. So, there were a lot of patched together areas inside this wall. 


Here's the rest of the room, now naked, after removing the soggy drywall and soaked insulation. 

The view from inside the kitchen. With this wall being opened up to replace the burnt 2x4s, we realized how neat it would be to go ahead and leave it opened up and move our family room to this room, just off the kitchen. 

We added a new, strong header to replace the studs in the wall. 


A new step down into the family room was built out of the salvaged tongue and groove boards. 

The walls and ceiling are painted in greys and browns. All mis-tinted paint that we were fortunate to get. 

I have a lot more "family" pictures to hang, but this is a good start. 

Beautiful ceiling fan donated by a local lighting company. 

View from the kitchen. I love the flow of these two rooms now! Very family friendly!

Above: This is the "computer cubby" made out of salvaged tongue and groove boards. 


Two pictures above: We made a double sided bar, also out of our salvaged shiplap.
Another great place for kids to sit, eat, draw, etc. 


Wednesday, April 18, 2018

Walls Taking Shape

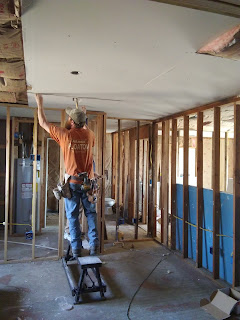
This is sort of "old news", but I never did mention this in earlier posts.... I guess I was too consumed with my beautiful kitchen (haha!). Here's a few random pictures of the walls and ceilings getting their insulation installed and drywall hung. 


So much pink stuff! I was seriously seeing insulation in my sleep! 


The wonderful folks at A&D Supply donated some scratch and dent dryall. Had more than enough for all our needs. What great people! 


Kitchen Complete! (THE Last Kitchen Post, I Promise!)

It is so good to be back home and finally able to post on my computer. 
We've finished the kitchen---- actually, now that I think about it, it's not 100% just yet... still have a bit of trim to put up--- but it's close enough to write a "finished" post for it. It's so beautiful I just can't stop myself from sharing! 

Get ready for lots of pictures!

I painted the ugly, old, metal door to the laundry room a glossy "colonial red".
I really like the way it turned out. 

Love the light fixtures that were so kindly donated to us by a wonderful, local lighting company! 

After opening up this wall between the kitchen and what used to be our bedroom, we decided to make it the family room, and built this nifty little "double bar" area. We reused some of our wonderful shiplap/tongue and groove wood that we salvaged from the upstairs ceiling.  

Having colors in the kitchen is definitely something new for me. I've always been a strictly all-white paint, farmhouse style kinda girl. But I really, really love my new, old kitchen. 

Open shelving is also a new thing for me, and I just sorta threw this random stuff up there. I have more kitchen boxes that need to be unpacked and gone through. Everything was so hastily boxed up after the fire, that I'll need to take some time to sort it all out. 

If you look closely at the brown colored shelf/cup hanger, you'll see where it was starting to burn. It had been hanging on that wall where the fire was moving down into, from the room up above the kitchen. 

At the time the above pictures were taken, we hadn't refinished the original wood floor yet. Here are some pictures of that process:
Using an orbital floor sander with open 20 grit sand paper, we attempted to remove all the old nasty glue that had been applied, along with nails, when they had installed plywood and linoleum over this beautiful floor years and years ago. 

Some of the glue just wouldn't budge, even after getting down there ourselves and scraping and picking and peeling. But the majority of the floor looks great so we just decided to go with it. 


Two coats of polyurethane later, and I'm now even more in love with our kitchen than I was before!